Chapter 2 - Post-Install Linux Configuration
We are now ready to configure the system. Not a lot is needed here; we will fix up the network configuration, add a personal user account (logging in as root is a very bad idea), set up sudo for convenience and disable remote root logins.
Enable network interfaces
In the installation stage, we didn't set up networking, so the installer assumed that if we did later enable networking, we would want to be a DHCP client. For a web server, this is very unlikely. However, so long as you are happy using the vim text editor, it's faster and easier to fix up networking after the install than to bother doing all that typing during the installation stage.
As root, edit the configuration file /etc/sysconfig/network-scripts/ifcfg-eth0:
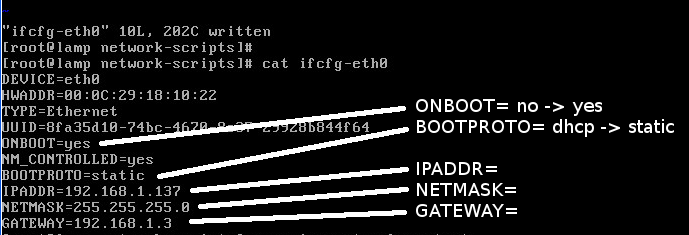
Change these two lines:
ONBOOT=no
...
BOOTPROTO=dhcp
to:
ONBOOT=yes
...
BOOTPROTO=static
and add your IP configuration. Yours will likely be different from this. The IPADDR line sets the IP address of the machine. NETMASK is likely to be 255.255.255.0; check with whoever runs your network, or check the setup of your router. GATEWAY is the IP address of your router. This is normally the lowest-numbered device, so 192.168.1.1 (though in this particular example, it happens to be 192.168.1.3).
IPADDR=192.168.1.137
NETMASK=255.255.255.0
GATEWAY=192.168.1.3
Now, edit /etc/hosts and make sure that there is a line for your server. In this case, I added:
192.168.1.137 lamp lamp.example.com
You will also need to add your own DNS configuration. This is quite likely to be the same IP address as the router, and the following one line is likely to be sufficient (note: the file really is called resolv.conf and not resolve.conf). If in doubt of your DNS settings, check with another machine on the same network.
echo "nameserver 192.168.1.3" > /etc/resolv.conf
Finally, restart the network stack:

Add a Personal User Account
Create a user account for yourself to log in with. We will be disabling remote root logins later, since that is very bad for security. Here I create an account called "john" with a User ID of 12345 for a user named "John Doe". In this example, I also give John a password of "john". The system warns me that it is both too simple and too short, but when root sets a password, the warnings are ignored and the password is set as requested. Of course, it is still a very bad idea for John to have a password of "john"! However, it keeps things simple for our purposes.
[root@lamp ~#] useradd -u 12345 -c "John Doe" john
[root@lamp ~#] passwd john
Changing password for user john.
New password: john
BAD PASSWORD: it is too short
BAD PASSWORD: is too simple
Retype new password: john
passwd: all authentication tokens updated successfully.
[root@lamp ~#]
Log in Remotely
Now John should be able to log in to the system remotely. Here, he's logging in from a machine called "desktop". The first time you ssh to a newly-installed machine, the client will warn that it does not recognize the remote server's SSH key. That is okay, because it's a new install with a new, randomly-generated key. However, if this message is shown when logging in to a system you regularly connect to, it is an indication that the remote system has been compromised, possibly by a "Man in the Middle" attack.
In this example, John had some SSH keys of his own set up, so the system also prompts for the passphrase to unlock those keys, but he presses Enter to tell it that there is no passphrase. The SSH process on the server then falls back to trying password authentication.
desktop$ ssh john@192.168.1.137
The authenticity of host '192.168.1.137 (192.168.1.137)' can't be established.
RSA key fingerprint is d7:09:85:16:3c:f9:89:da:ad:46:7c:4c:99:ce:e9:7d.
Are you sure you want to continue connecting (yes/no)? yes
Warning: Permanently added '192.168.1.137' (RSA) to the list of known hosts.
Enter passphrase for key '/home/john/.ssh/id_rsa': Enter
john@192.168.1.137's password: john
[john@lamp ~]$
Configure sudo
The sudo, or SUperuser DO, command, can be used to execute any command as any other user. It is a powerful and flexible tool, and it can be configured with fine granularity, for example such that John can run the rpm command as root, but only to install and remove the lsof package, or so that John can run the apachectl command to stop and start the web server, but he can't edit the web server's HTML files.
At the moment, if John tries to use the sudo command, he will get the following scary-sounding warnings:
[john@lamp ~]$ sudo su -

We trust you have received the usual lecture from the local System
Administrator. It usually boils down to these three things:

#1) Respect the privacy of others.
#2) Think before you type.
#3) With great power comes great responsibility.

[sudo] password for john: john
john is not in the sudoers file. This incident will be reported.
[john@lamp ~]$
On Red Hat (and therefore also on CentOS) there is a predefined group called wheel. Historically, any member of the wheel group could use the su command to get a root shell. That predated sudo, but the sudo system still provides a template for providing the same mechanism. That is what we will use here. We will also make use of the visudo command. visudo is a tool which allows you to edit a temporary copy of the /etc/sudoers configuration file, checks it for syntax errors, and installs the new version if it passes the sanity checks. This is particularly important, as sudo will refuse to read its configuration file at all (and therefore allows nobody to change any privileges) if the syntax is incorrect, or if the permissions on the file are not correct.
When you run the visudo command as root, around line 104 you should fine these five lines (I've added the line numbers with the :number command in vim):
104 ## Allows people in group wheel to run all commands
105 # %wheel ALL=(ALL) ALL
106
107 ## Same thing without a password
108 # %wheel ALL=(ALL) NOPASSWD: ALL
Line 105 (highlighted), if uncommented, would say that members of the wheel group can run, on ALL servers that this directive is found on, as ALL users, ALL accounts. That is as generic a rule as it is possible to grant; for our server lamp.example.com, we could be more precise (and make all of the ALLs make more sense) by instead saying:
%wheel lamp.example.com=(root) ALL
This tells us that members of the wheel group can run ALL commands, as root, on the machine called lamp.example.com.
Add this line after the highlighted line, so that the file now looks like this:
## Allows people in group wheel to run all commands
# %wheel ALL=(ALL) ALL
%wheel lamp.example.com=(root) ALL

## Same thing without a password
# %wheel ALL=(ALL) NOPASSWD: ALL
Save the file, it will be checked for syntax, and if okay, the new file will be instated.
However, John is not in the wheel group. That is easily fixed with the usermod command:
[root@lamp ~]# groups john
john : john
[root@lamp ~]# usermod -G wheel john
[root@lamp ~]# groups john
john : john wheel
[root@lamp ~]#
John must log out and log back in again for this change to his group membership to take effect.
desktop$ ssh john@192.168.1.137
Enter passphrase for key '/home/john/.ssh/id_rsa': Enter
john@192.168.1.137's password: john
Last login: Sat Apr 13 15:19:19 2013 from 192.168.1.13
[john@lamp ~]$ sudo su -
[sudo] password for john: john
[root@lamp ~]#
Harden SSH
By default, remote root logins are permitted. This is not a good idea; if somebody can brute-force the password, or otherwise guess it, then can take full control of your system. All you will know (at best) is the IP from which they arrived, which is unlikely to be their own IP, as they could have bounced through various systems to get to yours.
Better is to disable remote root logins, and to allow sudo as shown above. That way, John doesn't even need to know what the root password is, and his access rights can be changed as needed, without any change to root.
Edit /etc/ssh/sshd_config. Uncomment this line, and change the yes to a no:
#PermitRootLogin yes
It should look like this:
PermitRootLogin no
A nice thing about sshd_config, and some other configuration files, is that it shows the default values in comments, so it is not only telling you that there is an option called PermitRootLogin, but it is also telling you that by default, this is enabled. Because of this, I like to actually leave the comments as they are, so that the file ends up looking like this:
#PermitRootLogin yes
PermitRootLogin no
For this change to be re-read, we must restart the ssh server:
[root@lamp ~]# service sshd restart
Stopping sshd: [ OK ]
Starting sshd: [ OK ]
[root@lamp ~]#
Now, John can log in as himself, and get root priviliges, but nobody can log in directly as root over the network. For maintenance purposes, root can still log in via the console.
Useful Tools
There are various other useful tools which were not installed as part of our "minimal" installation. I like to have at least man to read online documentation, telnet client for debugging, and lsof for checking network ports and open files.
[root@lamp ~]# yum install man telnet lsof
That's it! Our basic Linux install is done. Time to move on to installing the Apache httpd web server.