Chapter 4 - Apache Configuration
Now that it is installed, there are a lot of things that can be tweaked with the Apache web server. Here, we will configure whether or not the web server is available to the external network, cover some basic diagnostics, enable the web server to start automatically on system boot, and finally install PHP.
Apache Security
By default, the only thing protecting the web server from the outside world is the iptables kernel-level firewall. The initial configuration on Red Hat 6 is that only incoming pings and incoming ssh connections will be accepted. Whether you want to accept requests from the network, or lock your system down so that the LAMP stack is only available to web browsers actually running on the local system, is a security choice for you to make. We will cover both options here.
Security #1 - Local connections only
If you don't want your web server serving external requests, it is best to also set the Listen directive in /etc/httpd/conf/httpd.conf to tell it exactly what you do want it to listen to. This multi-layered approach to security is commonly known as Defense in Depth, and is a key factor in the decades-long success of Unix and Unix-like systems.
Here are three different Listen directives, which provide the most secure configuration (accept connections only from the local machine), least secure (accept connections from anywhere) and a typical compromise (accept connections from outside, but only if the came in on a particular network interface).
# Listen on port 80, but only on the loopback device
Listen 127.0.0.1:80

# Listen on port 80 on all interfaces
Listen 80

# Listen on the 192.168.1.137 interface only
Listen 192.168.1.137:80
For example, your server may have an external-facing IP address, an internal management network and an internal storage network. If you only want it to listen on the internal management network, then put that IP address in httpd.conf. You can have as many Listen directives as you like - they are added together.
For the purposes of this document, we will assume that if you have used the first option, you will be using a web browser installed on the server itself for your testing. External machines will not be able to access your lovely new web server.
Any time you change httpd.conf you will need to restart the httpd daemon:
[root@lamp ~]# service httpd restart
Stopping httpd: [ OK ]
Starting httpd: [ OK ]
[root@lamp ~]#
If (as is very likely), you get this message when restarting the web server
[root@lamp ~]# service httpd restart
Stopping httpd: [ OK ]
Starting httpd: httpd: Could not reliably determine the server's fully qualified domain name, using lamp.example.com for ServerName
[ OK ]
[root@lamp ~]#
Then edit /etc/httpd/conf/httpd.conf, and find the ServerName directive. It is likely to be commented out, as shown below. Rather than editing the commented line, I tend to add the actual value on the following line, like this:
#ServerName www.example.com:80
ServerName lamp.example.com:80
Security #2 - Listen to the Network
If you do want your web server to accept requests from external systems, you will need to relax the default firewall rules, by adding port 80 (the port number used by regular web servers) to the "allowed" list of the firewall.
The easiest way to edit the iptables firewall rules is to edit the /etc/sysconfig/iptables file directly. Add the --dport 80 line, just like the existing --dport 22 line (dport is short for "destination port"):
-A INPUT -m state --state NEW -m tcp -p tcp --dport 22 -j ACCEPT
-A INPUT -m state --state NEW -m tcp -p tcp --dport 80 -j ACCEPT
Then restart the firewall:
[root@lamp ~]# service iptables restart
iptables: Flushing firewall rules: [ OK ]
iptables: Setting chains to policy ACCEPT: filter [ OK ]
iptables: Unloading modules: [ OK ]
iptables: Applying firewall rules: [ OK ]
[root@lamp ~]#
Incoming requests on port 80 will now be allowed through by the in-kernel iptables firewall, and will be picked up by the Apache httpd process.
Testing Apache
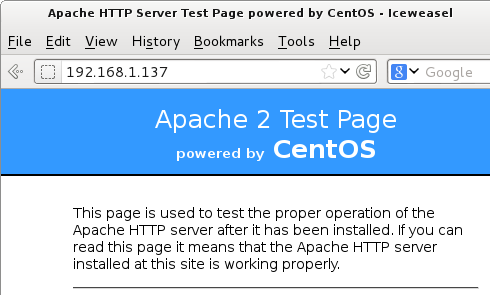
The quickest and easiest test is to point your web browser at the IP address of the server. You should get the default CentOS (or Red Hat) web page.
Troubleshoot Apache
If the page is not properly displayed, check with netstat to see if you have anything LISTENing on port 80.
# Listening on all ports
[root@lamp ~]# netstat -an | grep -w 80
tcp 0 0 :::80 :::* LISTEN
[root@lamp ~]#

# Listening only on 127.0.0.1 (localhost - local connections only)
[root@lamp ~]# netstat -an | grep -w 80
tcp 0 0 127.0.0.1:80 0.0.0.0:* LISTEN

# httpd is not running, or is not on port 80
[root@lamp ~]# netstat -an | grep -w 80
[root@lamp ~]#
You can also check that the processes are running, via the ps command. You should see a few daemons running (at least as many as the MinSpareServers directive in httpd.conf).
root, to be able to claim the restricted port 80 address (ports below 1024 are only available to the root user). Apache has a neat way of providing another example of Security in Depth. To listen on port 80, it has to be root, but if a security problem is found (and it has to be assumed that they will be found) in a root process, then the whole server is compromised. Apache has to be started as root to claim port 80, but as soon as it has done that, it switches to the user and group listed in the User and Group directives in httpd.conf. All of its child processes then run as the unprivileged apache user, which can't even run a shell. They only inherit the privileged port 80 from their root parent.[root@lamp conf]# ps -eaf | grep httpd root 8561 1 0 16:25 ? 00:00:00 /usr/sbin/httpd apache 8563 8561 0 16:25 ? 00:00:00 /usr/sbin/httpd apache 8564 8561 0 16:25 ? 00:00:00 /usr/sbin/httpd apache 8565 8561 0 16:25 ? 00:00:00 /usr/sbin/httpd apache 8566 8561 0 16:25 ? 00:00:00 /usr/sbin/httpd apache 8567 8561 0 16:25 ? 00:00:00 /usr/sbin/httpd apache 8568 8561 0 16:25 ? 00:00:00 /usr/sbin/httpd apache 8569 8561 0 16:25 ? 00:00:00 /usr/sbin/httpd apache 8570 8561 0 16:25 ? 00:00:00 /usr/sbin/httpd root 8611 1978 0 16:29 pts/1 00:00:00 grep httpd [root@lamp conf]#
If no output comes from the above command, then you have no Apache web server processes running. Try "service httpd start" as root, and also check the logs in /var/log/httpd/error_log.
If the server is running, and you have telnet installed (it is easy to install - just "yum install telnet"), then try to use telnet to connect to port 80:
GET /" instruction, which you type in after the "Escape character" line has been displayed, is an HTTP request, like a web browser would send to a server. It says "Get me the front webpage. It is vital that you press Enter a second time after the GET / line.[root@lamp ~]# telnet localhost 80 Trying ::1... Connected to localhost. Escape character is '^]'. GET / Enter (that is, you press the Enter key a second time) <!DOCTYPE html PUBLIC "-//W3C//DTD XHTML 1.1//EN" "http://www.w3.org/TR/xhtml11/DTD/xhtml11.dtd"> <head> <title>Apache HTTP Server Test Page powered by CentOS<title> ... followed by lots more HTML ... [root@lamp ~]#
If instead you see this, then the web server is not accepting connections on port 80.
::1" you see here is the IPv6 version of localhost; IPv6 is a fascinating topic but sadly beyond the scope of this book.[root@lamp ~]# telnet localhost 80 Trying ::1... telnet: connect to address ::1: Connection refused Trying 127.0.0.1... telnet: connect to address 127.0.0.1: Connection refused [root@lamp ~]#
Use the methods above to confirm that the processes are running and listening on the expected ports. Check the httpd.conf file too, and the /var/log/httpd/access_log and /var/log/httpd/error_log log files.
Install your own Test Page
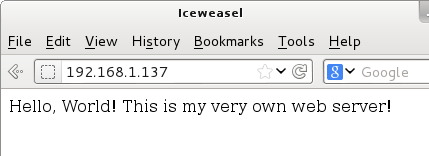
By default, noindex.html page is installed, but /var/www/error/noindex.html is configured (by /etc/httpd/conf.d/welcome.conf) to be displayed in that situation. It is probably best to leave that setup as it is. To install your own content, to show that you are serving your own pages, edit /var/www/html/index.html. Just this much should be enough:
<html>
<body>
Hello, World! This is my very own web server!
<body>
<html>
Now browse again to the server, and you should see the fruits of your labor:
Enable Start at Boot
The chkconfig command is a nifty little thing which sets up runlevels for you. Thanks to projects like Upstart and SMF, the /etc/init.d/ tools of traditional Unix are likely to die out eventually, but chkconfig gives a nice and tidy view of the underlying details.
[root@lamp ~]# chkconfig httpd on
[root@lamp ~]# chkconfig --list httpd
httpd 0:off 1:off 2:on 3:on 4:on 5:on 6:off
[root@lamp ~]#