Chapter 11 - Start Building the Application
We are now ready to start building the application. First of all, a lot of common functions can go into a centralized "functions.php" file. This will save rewriting the same or similar functions for a bunch of related pages. The way that web applications work, we are exposing some of the design of the application in the URL structure presented to users, so whilst with a C program we could put everything into one huge "myprogram.c" file or split it into multiple files, in PHP the individual parts of the application are split into different files and presented as such in the URL (item.php, register.php, etc). A common "functions.php" file is useful as a kind of library file.
This "functions.php" file contains a few simple functions: head() and foot() give a simple way to show the standard headers and footers on every page, giving a uniform look. The default "<title>" tag is "WishList", but any other title can be provided by calling the function with an argument, like "head("Hello, World")".
The cleandie() function implements the clean shutdown mechanism mentioned earlier, rather than using the native die() which would not close down the HTML tags cleanly. The dbcon() function acts as a shortcut for connecting to the database, which dies (cleanly) if it is unable to connect. showitem() is a utility function called by showitems(). The latter does a SQL query to grab individual items from the database, and then passes each in turn to be displayed. This means that the display code can be written once in showitem(), and reused in multiple places, keeping the code simpler and therefore more maintainable. It also means that if you change how an item is displayed, that change only has to be made once.
<?php

/* show HTML header */
function head($title="WishList")
{
echo "<html>";
echo "<head>";
echo " <title>" . $title . "</title>";
echo " <link rel='stylesheet' type='text/css' href='/style.css'";
echo "</head>";
echo "<body>";
}

/* show HTML footer */
function foot()
{
echo "</body>";
echo "</html>";
}

/* Clean version of die() */
function cleandie($msg)
{
echo "<hr />";
echo "<h1>FATAL ERROR: " . $msg . "</h1>";
echo "</hr />";
foot(); // display standard footer
flush(); // ensure everything has been sent
// to the client before quitting
exit(); // exit cleanly
}

/* connect to database and select the wishlist */
function dbcon()
{
mysql_connect("localhost", "wishuser", "wishpass")
or cleandie ("Failed to connect to db: " . mysql_error());
mysql_select_db("wishlist")
or cleandie ("Failed to select database");
}

/* show a single item, when passed its associative array */
function showitem($itemrow)
{
echo "Item " . $itemrow['id'] . ": " . $itemrow['title'];
echo " ($" . $itemrow['price'] . ") at " . $itemrow['url'] . "<br/>";
}

/* show all items, given a particular condition */
function showitems($where)
{
$result=mysql_query("select * from item " . $where . ";");
while ($itemrow = mysql_fetch_assoc($result)) {
showitem($itemrow);
}
}

?>
"index.php" is now much shorter, and, like "functions.php", is all pure PHP now, rather than an HTML web page with a little bit of PHP thrown in the middle of it. The virtual() function includes a file relative to the web site's DocumentRoot, so "virtual("/functions.php")" will get http://example.com/functions.php, while "virtual("/wishlist/functions.php")" will get http://example.com/wishlist/functions.php. There is also a similar function named include(), which can get files from outside of the web tree entirely, and so is potentially more secure since the web server can never be tricked into displaying the functions themselves. If an attacker calls http://example.com/functions.php directly, they shouldn't see any code because there are only function definitions, but again, using the principle of Defense in Depth, keeping things out of the web tree if they don't need to be there safeguards against any potential flaws found in the web server.
So "index.php" now looks like this. As it's changing from a test page to an item-specific page, we will rename it as "item.php" in a minute, but for now, it has mutated as shown:
<?php
/* Read in the generic functions and display header */
virtual("/functions.php");
head();

/* Connect to database */
dbcon();

/* Show all items */
showitems();

/* Close off tidily */
foot();
?>
Add Images to Items
Before going any further with this, one tweak to the item table is that we are surely going to want to include images of the items, so let's add a BLOB (Binary Large OBject) to the database. There are two ways of storing images - we could store the files in the filesystem (that is, after all, what a filesystem is for!) and store the URL in the database, or store the image itself in the database as a BLOB. http://www.onlineaspect.com/2007/07/10/image-storage-database-or-file-system/ has a good discussion including some practical points about how very high-volume sites like PhotoBucket.com (NFS filesystem) and FaceBook.com (MySQL database) store images. Because in this case the images will be reasonably small thumbnails, and we're expecting a reasonably low traffic volume, we will store the images in the database. If the point is contentious for massive sites like those, there is no clear-cut right or wrong way to do this for a small example application like this.
Going back to phpMyAdmin, select the wishlist database and the item table. Under the "Structure" tab, change the number to that it says "add 2 colum(s)" and make it "After title" then press "Go":

Add an "imagetype" VARCHAR of 255 to store the image type (image/png, image/jpg, etc) and an "image" BLOB to store the actual image data. Press "Save" to save your changes.

For testing purposes, we will manually insert an image, just as we have (so far) been manually inserting other data. Of course, eventually this will be done by end users via the web application that we have yet to build!
Using the "Browse" tab, click on "Edit" next to the item you want to add an image to. My file is a JPG, so I set the "imagetype" as "image/jpg"; set yours accordingly. Upload your image file via the "Choose File" button, and press "Go" when done.

Create the Item Page
We can then add a bit more detail to the HTML formatting, add a placeholder image (/var/www/html/img/noimage.png - you'll need to create the "img/" subdirectory) for when there is no image available. The changes to the code are relatively minor; the showitem() function in functions.php has got some formatting added, and item.php has been copied from index.php, and changed to call showitem() with some error checking around it:
Updated showitem() function in functions.php
/* show a single item, when passed its associative array */
function showitem($itemrow)
{
echo "<div class='item'>";
echo "<h2>" . $itemrow['title'] . "</h2>";
if (!empty($itemrow['image']))
echo "<img src='/showimage.php?id=" . $itemrow['id'] . "'>";
else
echo "<img src='/img/noimage.png'>";
echo "<a target='_blank' href='" . $itemrow['url'] . "'>Click to Buy</a>";
echo " ($" . $itemrow['price'] . ")";
echo "<br />";
echo " (opens in new window / tab)";
/* "clear: both" clears everything up after the left-floated image */
echo "<div style='clear: both;'></div>";
echo "</div>";
}
New File: showimage.php
This simpleshowimage.php script pulls the image data from the database, and serves it up as an image.
<?php
virtual("/functions.php");
dbcon();

$query="select image,imagetype from item where id='" . $_GET["id"] . "';";
$result=mysql_query($query);
$row = @mysql_fetch_assoc($result);
header("Content-Type: " . $row["imagetype"]);
print $row["image"];
?>
New File: item.php (based on index.php)
The newly-modified index.php now looks like this, as item.php. Notice that the user-submitted item, which could be anything (for example, '/item/php?item=1 or 2'), is sanitized by the filter_var() function for safety, since we know that it should only ever be an integer. filter_var only appeared in version 5.2.0 of PHP; A simple preg_replace() could do something similar for older versions of PHP; just search the web for "php remove non-numeric" or a similar search term.
<?php
/* Read in the generic functions and display header */
virtual("/functions.php");

/* Connect to database */
dbcon();

if (isset($_GET['item'])) {
$itemid=filter_var($_GET['item'], FILTER_SANITIZE_NUMBER_INT);
$result=mysql_query("select * from item where id='" . $itemid . "';");
if (mysql_num_rows($result) == 1) {
// We got a result - process it
head("WishList - Item Detail");
showitem(mysql_fetch_assoc($result));
} else {
/* We didn't get a result from the database -
* there is no item matching the requested one. */
head("WishList - Error!");
cleandie("No such item");
}
}
else {
/* There was no request; item.php by itself is not
* valid, the request must be of the form item.php?item=123 */
head("WishList - Error!");
cleandie("No item specified");
}

/* Close off tidily */
foot();
?>
snapshot-1.sql
style.css
functions.php
img/noimage.png
showimage.php
item.php
index.php
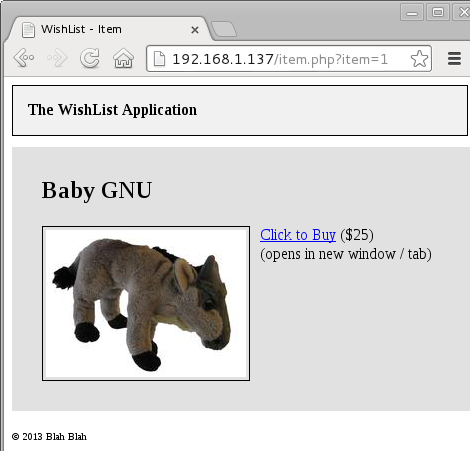
There are four different possible situations that the new item.php has to deal with. Notice the text after "item.php" in the Location bar for each one, and the different failure scenarios.
For item.php?item=1, it shows the Baby GNU, with some simple formatting.
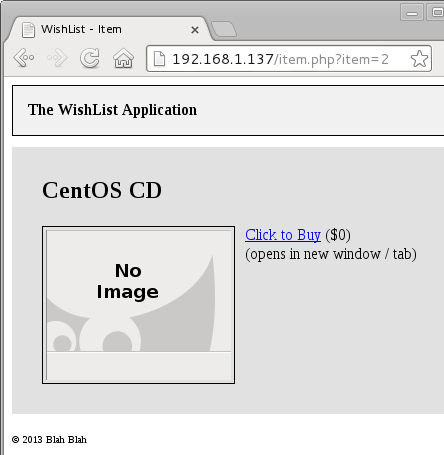
For item.php?item=2, it shows the CentOS CD, though no image has been uploaded for this yet, so this situation is detected, and a placeholder image is shown instead.
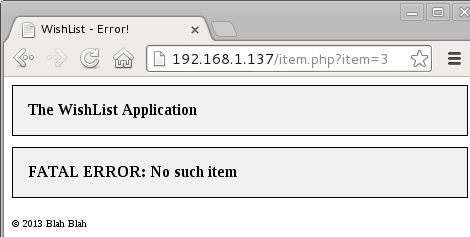
If item.php?item=3 is requested, but there is no item with an id of 3, then the page cannot continue; there is no sensible way of dealing with this invalid input, so an error message is shown.
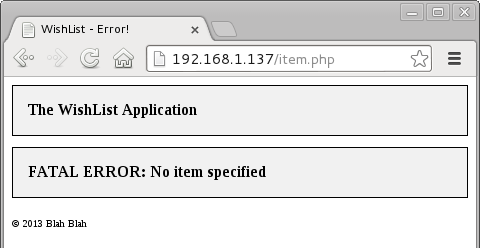
If item.php is called without any arguments, then again, it cannot be expected to show anything. Instead, it shows an error message reflecting this particular situation. By not using die() directly, the page footer is still shown; this can be important with better-designed HTML pages to ensure that the whole page is laid out properly.
This is still not a fully completed Item page, but it does the basics that it needs to do, and hopefully shows how the MySQL structure and the PHP code interact. Later, we will change this page so that users can create and edit items in the database.
Create the Wishlist Page
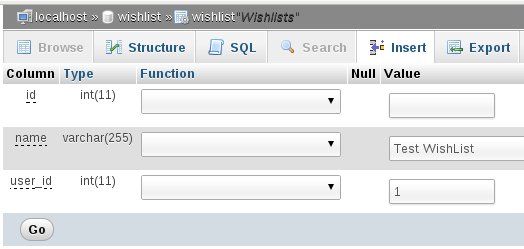
The WishList page is similar to the Item page; it displays the items in a WishList, and users can click through to the individual items. Later, it will show the status of items, allow for ordering the items by status, and so on. For now, it's a simple read from the database. Again, we will start by manually adding data into the "wishlist" table. Select the table, select the "Insert" tab, and enter "Test Wishlist" for the name, and "1" for the user_id. We haven't got on to users yet, but it's safe to assume that when we do, we'll start at number 1. Press "Go" to insert the data.
To display wishlists, there are two database queries; first, we query the wishlist table to get the name of the requested wishlist. This goes into the title tag of the web page. Then, we query the item table to get all items which are members of this wishlist. Then like in item.php, it's a loop through the results, putting them into a table for presentation. Because this is not likely to be used anywhere else, all of the database and display code is hidden away in wishlist.php; if it was likely to be more generically useful, it could go into functions.php.
New file: wishlist.php
<?php
/* Read in the generic functions and display header */
virtual("/functions.php");

/* Connect to database */
dbcon();

if (isset($_GET['list'])) {
$listid=$_GET['list'];
$query="select name from wishlist where id='" . $listid . "'";
$result=mysql_query($query);
if (mysql_num_rows($result) == 1) {
// We got a result - process it
$row=mysql_fetch_assoc($result);
head("WishList - " . $row['name']);
echo "<h1>" . $row['name'] . "</h1>";
// Now we can find all items belonging to this list.
// It is okay to reuse the $query and $result variables
$query="select * from item where wishlist_id='" . $listid . "';";
$result=mysql_query($query);
if (mysql_num_rows($result) == 0) {
echo "<h1>Empty Wishlist</h1>";
} else {
echo "<table>";
while ($row=mysql_fetch_assoc($result)) {
echo "n <tr><td>"; // First <td> is the image. Make it a link, too.
echo "<a href='item.php?item=" . $row['id'] . "'>";
if (!empty($row['image']))
echo "<img src='/showimage.php?id=" . $row['id'] . "'>";
else
echo "<img src='/img/noimage.png'>";
echo "</a></td><th>"; // Second <th> is the name of the item. Also a link.
echo "<a href='item.php?item=" . $row['id'] . "'>" . $row['title'] . "</a>";
echo "</th>"; // Third <td> is the price.
echo "<td>$" . $row['price'] . "</td></tr>";
}
echo "</table>";
}
} else {
/* We didn't get a result from the database -
* there is no item matching the requested one. */
head("WishList - Error!");
cleandie("No such WishList");
}
}
else {
/* There was no request; wishlist.php by itself is not
* valid, the request must be of the form wishlist.php?list=123 */
head("WishList - Error!");
cleandie("No WishList specified");
}

/* Close off tidily */
foot();
?>
The result of all this, is this small table:
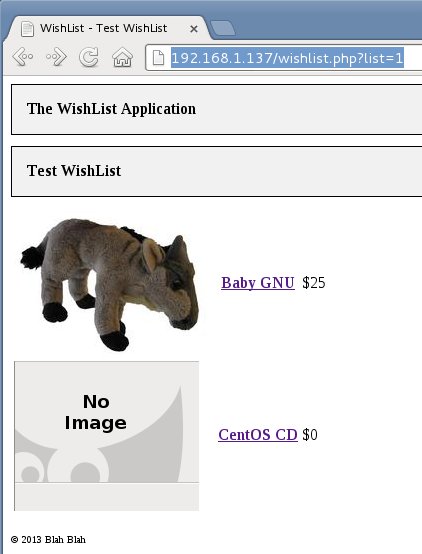
The table is structured with <td> and <th> cells. Each row begins with <tr>, then the first cell is the image, which is also a link to item.php:
<td><a href='item.php?item=1'><img src='/showimage.php?id=1'></a></td>
The second cell is also a link to item.php, but formatted as a <th> to highlight the text more.
<th><a href='item.php?item=1'>Baby GNU</a></th>
Finally, the price is put into its own cell, and the table row is ended:
<td>$25</td></tr>
A wishlistname() Function
It would be nice to include the name of the wishlist in item.php as well as in wishlist.php - let's add a generic function wishlistname() which gets the human-readable name of a wishlist, either from the wishlist id or from the id of an item in that wishlist. Here's what it looks like, we'll add it to functions.php:
function wishlistname($wishid, $itemid=0)
{
if ($wishid==0) {
// Get the wishlist ID from the item...
$query="select wishlist_id from item where id='" . $itemid . "';";
$result=mysql_query($query);
if (mysql_num_rows($result)==1) {
$row=mysql_fetch_assoc($result);
$wishid=$row['wishlist_id'];
}
}
if ($wishid==0) return "Invalid WishList ID";

// either because we've been passed it, or we've worked it out,
// we now have a valid wishlist id
$query="select name from wishlist where id='" . $wishid . "'";
$result=mysql_query($query);
if (mysql_num_rows($result) == 1) {
$row=mysql_fetch_assoc($result);
return $row['name'];
}
// If we get here, the list exists, but has no name. At least
// give the user something to use!
return "Unnamed List";
}
If wishlistname() is passed "0" as the first argument, it will find the wishlist ID from the item instead. Once execution gets to the second half of the function, it should have a valid wishlist ID, either because it's been passed one, or because it has worked it out from the item ID that it was given. Specifying "function wishlistname($wishid, $itemid=0)" in the function definition means that the second argument is optional, and will default to zero if only one argument is passed to the function. item.php now looks like this:
if (isset($_GET['item'])) {
$itemid=filter_var($_GET['item'], FILTER_SANITIZE_NUMBER_INT);
$result=mysql_query("select * from item where id='" . $itemid . "';");
if (mysql_num_rows($result) == 1) {
// We got a result - process it
$wishlistname=wishlistname(0, $itemid);
head("WishList - " . $wishlistname);
echo "<h1>" . $wishlistname . "</h1>";
showitem(mysql_fetch_assoc($result));
} else {
/* We didn't get a result from the database -
* there is no item matching the requested one. */
head("WishList - Error!");
cleandie("No such item");
}
}
wishlist.php is now simpler too, with one less level of error checking required:
<?php
/* Read in the generic functions and display header */
virtual("/functions.php");

/* Connect to database */
dbcon();

if (isset($_GET['list'])) {
$listid=$_GET['list'];
 $wishname=wishlistname($listid);
head ("WishList - " . $wishname);
echo "<h1>" . $wishname . "</h1>";
$query="select * from item where wishlist_id='" . $listid . "';";
$result=mysql_query($query);
if (mysql_num_rows($result) == 0) {
echo "<h1>Empty Wishlist</h1>";
} else {
echo "<table>";
while ($row=mysql_fetch_assoc($result)) {
echo "n <tr><td>"; // First <td> is the image. Make it a link, too.
echo "<a href='item.php?item=" . $row['id'] . "'>";
if (!empty($row['image']))
echo "<img src='/showimage.php?id=" . $row['id'] . "'>";
else
echo "<img src='/img/noimage.png'>";
echo "</td><th>"; // Second <th> is the name of the item. Also a link.
echo "<a href='item.php?item=" . $row['id'] . "'>" . $row['title'] . "</a>";
echo "</th>"; // Third <td> is the price.
echo "<td>$" . $row['price'] . "</td></tr>";
}
echo "</table>";
}
} else {
/* There was no request; wishlist.php by itself is not
* valid, the request must be of the form wishlist.php?list=123 */
head("WishList - Error!");
cleandie("No WishList specified");
}

/* Close off tidily */
foot();
?>
Adding Users
The next stage is to add users to the system. We have already created the user table in Chapter 9, and instead of adding items manually into the database which we have been doing for simplicity so far, let's start by adding users directly via the website. For this, we will need a registration form which creates a database entry, and a validation step whereby the user clicks the link in a confirmation email to acknowledge that they did intend to create the account. We'll also need a login mechanism.
New File: register.php
This page displays a very simple login page, and when the form is submitted, does some basic sanity checks, and creates a record in the database. For a production system, you'd want more sanity checks, and possibly do some client-side checking too, for a better user experience.
<?php
/* Read in the generic functions and display header */
virtual("/functions.php");
head();

if (isset($_POST['register'])) {
// Sanity checks on the input data
if (strlen($_POST['username']) < 3)
cleandie("Name too short");
if (strlen($_POST['userpass']) < 6)
cleandie("Passwords must be 6 characters or longer");
if ($_POST['userpass'] != $_POST['confirmpass'])
cleandie("Passwords do not match.");
if (strpos($_POST['useremail'], "@") === false)
cleandie("Invalid email address");

// Connect to the database only when we need to
dbcon();

$username=mysql_real_escape_string($_POST['username']);
$email=mysql_real_escape_string($_POST['useremail']);
$crypted_password=crypt($_POST['userpass']);

$result=mysql_query($query);
if (mysql_num_rows($result)==0) {
// We don't have to tell the visitor everything; there's no need to
// validate the submitted id, either because it doesn't exist, or because
// it's already validated. This way, we're not leaking too much information.
cleandie("That email address is not registered or is already confirmed.");
}

// If we get this far, the form was filled out okay.
$query="insert into user(name, email, password) values('" .
$username . "', '" . $email . "', '" . $crypted_password . "');";
// to validate this password later: if (crypt($user_input, $db_entry) == $db_entry)
$result=mysql_query($query);
if (!$result) die("Database insertion failed.");
$userid=mysql_insert_id();
echo "<h1>Created user account</h1>";
$emailmsg="Somebody has requested that a WishList account has been created for you ";
$emailmsg .= "at example.com. If you did not do this, there is no need to do anything; ";
$emailmsg .= "nothing further will happen. If you want to register your account, ";
$emailmsg .= "please click on the following link: ";
$emailmsg .= "http://example.com/confirm.php?email=" . $email;
$emailmsg .= "&hash=" . base64_encode($username . $crypted_password);
$emailmsg .= " - Thanks, the wishlist@example.com team.";
mail($email, "Wishlist Account Created", $emailmsg);
echo "Created user account for " . $email . ". ";
echo "Please check your email for a confirmation link. ";
echo "Click that link to activate your account.";
}
else {
?>
<h1>Register</h1>
<form action="/register.php" method="post">
Name: <input type=text name=username value="Enter your name"><br />
Email: <input type=text name=useremail value="user@example.com"><br />
Password: <input type=text name=userpass value="Choose a password"><br />
Confirm Password: <input type=text name=confirmpass value="Confirm password"><br />
<input type=submit name=register value="Register">
</form>
<?php
}

/* Close off tidily */
foot();
?>
Encryption
It is obviously a bad idea to store passwords in plain text - if somebody hacks your database, they will have access to all of your users' accounts. The password is encrypted via the PHP function crypt(). This install of Red Hat should have the MD5 crypt libraries available, in which case crypt will use MD5 hashing. If not, it could fall back to DES encryption, which is no longer considered very strong. We will assume MD5 encryption in the description that follows.
MD5 is a one-way routine which creates what is called a "hash" of the plain text. "hello" becomes "5d41402abc4b2a76b9719d911017c592", and "hello world" becomes "5eb63bbbe01eeed093cb22bb8f5acdc3". There is no known way to get back from the hash to the plain text, but since a lot of people use the same poorly-chosen passwords ("password123", "letmein", and so on), an attacker can create his own MD5 hashes of these common passwords and compare them against the hashes in the database. This is known as a "Rainbow Table attack", and can be used to very quickly attack hashed passwords.
The encryption used here takes the hashing a step further: The system generates a random "salt" value, which is mixed with the original password, and then used to encrypt the password. So "hello" becomes "f9bNtKPxphello", the hash of which is "f4b2a7d99fa99436d263b4daa0b335ef", completely unrelated to the hash of "hello" by itself. Storing the salt with the encrypted password, as "$f9bNtKPxp$f4b2a7d99fa99436d263b4daa0b335ef", allows the system to confirm a valid password when the user logs in by repeating the same process, but it does not allow an attacker to pre-compute Rainbow Tables based on commonly-used words alone. Even a database administrator working on the database would not be able to compute the plaintext password from the entries in the database. The attacker would have to encode the salt "$f9bNtKPxp$" with every possible password to guess John's password, and then repeat the same process again to try and guess the next user's password. This is significantly more time-consuming than the near-instant Rainbow Table attack.
Registration
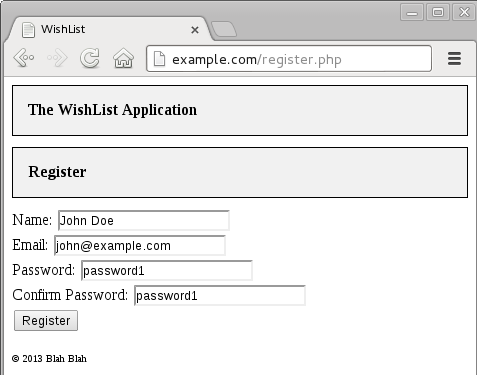
John comes along and registers, and his account is created.
Now, John needs to validate his account. The LAMP server will need to send an email confirming the account creation, so outbound email sending is a requirement. Firewalls may need to be configured and so on, but as a rule, if DNS is configured correctly on the system, it is likely that sending outbound emails should work from most typical internet-connected systems.
getsebool and set it with setsebool. The -P flag to setsebool makes the change persistent. This takes a few seconds to run.[root@lamp html]# getsebool httpd_can_sendmail httpd_can_sendmail --> off [root@lamp html]# setsebool -P httpd_can_sendmail 1 [root@lamp html]# getsebool httpd_can_sendmail httpd_can_sendmail --> on [root@lamp html]#
You will also have to restart postfix:
[root@lamp html]# service postfix restart
Shutting down postfix: [ OK ]
Starting postfix: [ OK ]
[root@lamp html]#
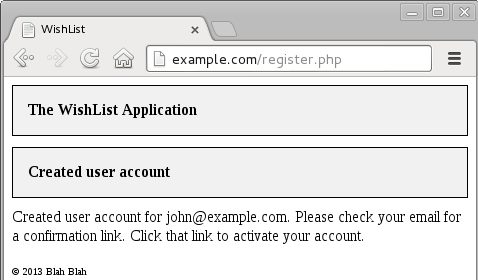
Once registered, John should see a confirmation page. This is still register.php, but the first "if (isset($_POST['register']))" part of the page has been triggered by the "register" button, causing the page to be reloaded with the form data POSTed to it. The database can now be updated, and the confirmation email sent.
John should then receive his confirmation email. That hash in the URL is a base64 encoding of "John Doe" and the encrypted password, which no attacker should be able to guess. This should be sufficient to prove that John is the owner of that email account, and by base64-encoding the encrypted password with other text (the user's actual name), the original content (the encrypted password and the name) are lost, so can not be attacked by someone reading John's email to guess his actual password, but can be used to authenticate John for this one-time registration.
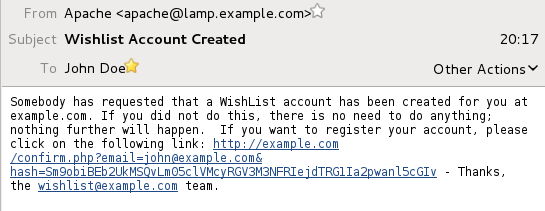
The next thing to do is to add a field to the user table, which tells us whether or not the user has confirmed their registration. If not, we won't allow them to log in. This time, just for the variety, let's use the MySQL command-line interface. It's not very difficult, and it's worth documenting the different ways that the database can be logged into and manipulated.
[root@lamp html]# mysql -u root -p
Enter password: dba (or whatever you set as the root password)
Welcome to the MySQL monitor. Commands end with ; or g.
Your MySQL connection id is 601
Server version: 5.1.67 Source distribution

Copyright (c) 2000, 2012, Oracle and/or its affiliates. All rights reserved.

Oracle is a registered trademark of Oracle Corporation and/or its
affiliates. Other names may be trademarks of their respective
owners.

Type 'help;' or 'h' for help. Type 'c' to clear the current input statement.

mysql> use wishlist;
Reading table information for completion of table and column names
You can turn off this feature to get a quicker startup with -A

Database changed
mysql> alter table `user` add `confirmed` int NULL default NULL;
Query OK, 1 row affected (0.12 sec)
Records: 1 Duplicates: 0 Warnings: 0

mysql> describe user;
+-----------+--------------+------+-----+---------+----------------+
| Field | Type | Null | Key | Default | Extra |
+-----------+--------------+------+-----+---------+----------------+
| id | int(11) | NO | PRI | NULL | auto_increment |
| name | varchar(255) | NO | | NULL | |
| email | varchar(255) | NO | | NULL | |
| password | varchar(255) | NO | | NULL | |
| confirmed | int(11) | YES | | NULL | |
+-----------+--------------+------+-----+---------+----------------+
5 rows in set (0.00 sec)

mysql> exit
Bye
[root@lamp html]#
This adds the confirmed integer to the database, which has a default value of "NULL". When confirming the account, we can then set it to a valid value (such as 1), and we will then know that the account has been validated.
New File: confirm.php
<?php
/* Read in the generic functions and display header */
virtual("/functions.php");
head();

// Connect to the database
dbcon();

$email=mysql_real_escape_string($_GET['email']);
$hash=mysql_real_escape_string($_GET['hash']);

// Check it's not already registered.
$query="select id,name,password from user where confirmed is NULL and email='" . $email . "';";
$result=mysql_query($query);
if (mysql_num_rows($result)==0) {
// We don't have to tell the visitor everything; there's no need to
// validate the submitted id, either because it doesn't exist, or because
// it's already validated. This way, we're not leaking too much information.
cleandie("That email address is not registered or is already confirmed.");
}

$row=mysql_fetch_assoc($result);
$userid=$row['id'];
$username=$row['name'];
$crypted_password=$row['password'];
$dbhash=base64_encode($username . $crypted_password);

if ($hash == $dbhash) {
$query="update user set confirmed='1' where id='" . $userid . "';";
$result=mysql_query($query);
echo "<h1>Account Confirmed</h1>";
echo "<p>Thank you, " . $username . ". Your account is now activated.</p>";
} else {
echo "<h1>Invalid Request</h1>";
echo "<p>Please check the link; you may need to copy and paste the link ";
echo "from the email, checking for line breaks inserted by the email client.</p>";
}

/* Close off tidily */
foot();
?>
confirm.php just repeats the transformation performed by register.php; if it gets the same result, then the link is valid, otherwise it is not valid and the account is not confirmed. By sending an invalid argument to confirm.php, we get an error message:
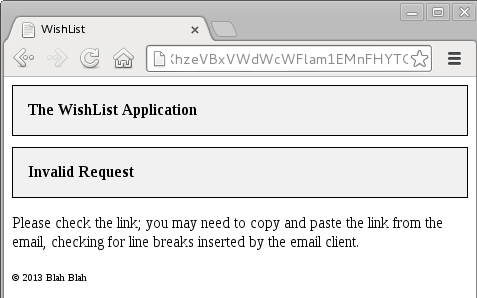
/etc/hosts like this for your test server; it makes URLs pointing at example.com go to your server. Substitute 192.168.1.137 for the IP of your web server.
192.168.1.137 example.com www.example.com
However, so long as the correct hash is sent, the account should be succesfully validated. The confirmed field has been set to 1, and when John logs in from now on, he will be able to successfully log in.
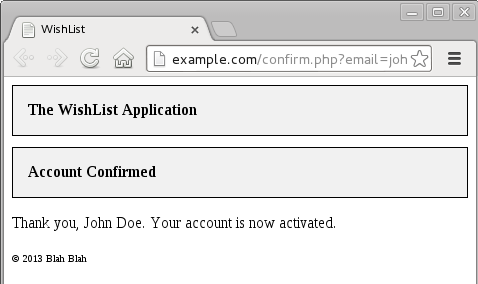
Login
When John comes to log in, we can check the provided password with the hash in the database, and also check that his account has been validated using the process just written. We can then set something called a SESSION variable, which will be valid for as long as his browser remains open, containing suitable credentials. Because the session variables are stored on the server side, they are relatively secure; session hijacking is possible, though there are ways to ameliorate the situation. That is all a bit beyond the scope of this book, however. For now, be aware that session variables are not a panacea, but they are certainly good enough for this example code. Cookies can also be used in a very similar fashion.
To start a session, before outputting any HTML (even whitespace), you need to call the session_start() function. To avoid all possibility of whitespace creeping in, I have put a session_start() at the very top of every page which requires it:
<?php session_start();
/* Read in the generic functions */
virtual("/functions.php");
The head() function in functions.php can now be modified to deal with the login process. If the page load is the result of pressing the "Login" button (which we will define soon), then it connects to the database, validates the credentials, and (if appropriate) sets the session variables. It then goes off to display the standard header information, and finally displays either the message "Welcome, John Doe" with a "Logout" link, or if not logged in, it displays the login form, with the "Login" button mentioned at the start of this paragraph, which will result in a new login attempt.
There is a special case - if the user is on the "logout" page, it does not reload the same page, as that would log them out again! Instead, it takes them to /index.php.
The head() function now looks like this:
/* show HTML header */
function head($title="WishList")
{
$loginid=0;
if (isset($_POST['login'])) {
// User is trying to log in
dbcon();
$useremail=mysql_real_escape_string($_POST['email']);
$query="select id,name,email,password from user where email='" . $useremail . "' and confirmed='1';";
$result=mysql_query($query);
if (mysql_num_rows($result)==1) {
$login=mysql_fetch_assoc($result);
$dbpass=$login['password'];
if (crypt($_POST['password'], $dbpass) == $dbpass) {
// successful login
$_SESSION['userid'] = $login['id'];
$_SESSION['name'] = $login['name'];
$loginid=$login['id'];
} else {
$loginid=-1;
}
}
}
echo "<html>";
echo "<head>";
echo " <title>" . $title . "</title>";
echo " <link rel='stylesheet' type='text/css' href='/style.css'";
echo "</head>";
echo "<body>";
if ( isset($_SESSION['userid']) && isset($_SESSION['name']) ) {
$loginid=$_SESSION['userid'];
echo "<p>Welcome, " . $_SESSION['name'] . ". (<a href='/logout.php'>Logout</a>)</p>";
} else {
if ($loginid == -1) echo "<p>Login failed.</p>";
$landingpage=$_SERVER['REQUEST_URI'];
if ($landingpage == "/logout.php") $landingpage="/index.php";
echo "<form action='" . $landingpage . "' method='post'>";
echo "Email: <input size=15 type=text name=email>";
echo "Password: <input size=8 type=password name=password>";
echo "<input type=submit name=login value='Login'>";
}
echo "<h1>The WishList Application</h1>";
}
I have also created a new file, logout.php, which is very simple. It destroys the whole session setup, in various ways, as a simple session_destroy() does not work on all browsers.
New file: logout.php
<?php
/* Read in the generic functions and display header */
virtual("/functions.php");
head();

session_start();
session_unset();
session_destroy();
session_write_close();
setcookie(session_name(),'',0,'/');
session_regenerate_id(true);

$loginid=0;
echo "<h1>Logged Out</h1>";
echo "<p>You have succesfully logged out.</p>";

/* Close off tidily */
foot();
?>
head() function uses $_SERVER['REQUEST_URI'] to set the form to load whatever page the browser was viewing at the time, so that they don't lose what they were looking at before logging in. REQUEST_URI includes any GET arguments, such as "?item=1".First, John enters his email address and password, and presses the "Login" button.

The same page is reloaded, but the login form is replaced with the message "Welcome, John Doe" and also a "Logout" link. Clicking that link will log him out again. (If the login details were not valid, the message "Login failed." would be shown, and the form redisplayed.)

Once logged out, John is shown the "Logged Out" message, and he is no longer logged in to the web application.
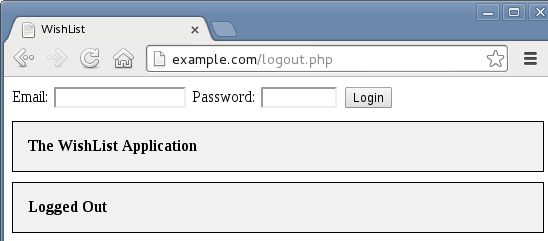
snapshot-2.sql
style.css
confirm.php
functions.php
index.php
item.php
logout.php
register.php
showimage.php
wishlist.php
img/noimage.png