Chapter 10 - Prototype Application
With the database set up, it's good to start building a prototype application to check that everything works as expected, and that the tasks we want to perform on the data are easy to code. Quite often at this stage, I find that I need to alter the structure of the database, either for performance or more likely just to make the coding simpler. There's no point in having a database with built-in features such as indexing if the application then ends up containing indexing code itself (which will be far less efficient), so tweaking the database structure can make a big difference to how the application is coded and structured.
There are coding techniques which can be used to sanitize input, ensure that what is written into the database is sensible, and so on, which can be added later. These practices can easily be added to existing code, but trying to add the fundamental security infrastructure on to an application not designed around it is bound to fail.
Populating the Database
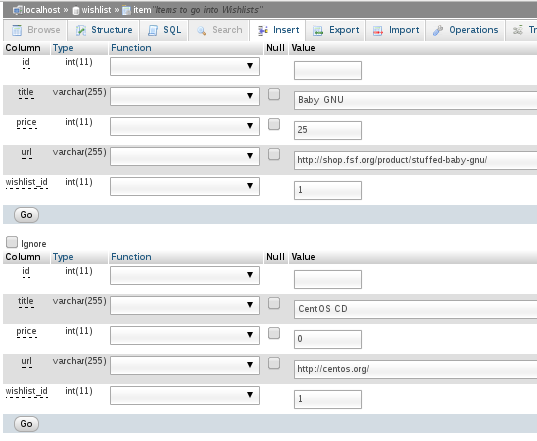
To test a connection to the database, we will use phpMyAdmin to insert some data into the database, and then write some PHP to retrieve and display that data. Select the item table, and click the "Insert" tab at the top. Leaving the "id" column blank (because Auto Increment will deal with that automatically), and enter suitable data for a couple of items.

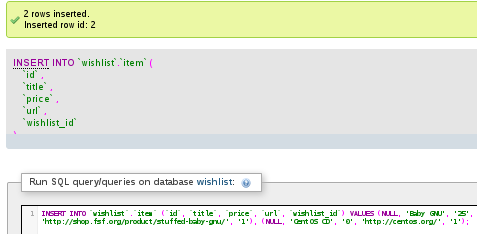
Click "Go" when done. phpMyAdmin helpfully shows the SQL code that it has created to execute your request. Notice that it says "2 rows inserted. Inserted row id: 2". This tells you that the ID of the last row inserted was #2. This can be useful later, because (particularly when - as more commonly happens - one row is inserted at a time) you immediately get the ID of the newly-inserted row, and can continue doing other work with that new reference ID for the new item.

Pulling Data from the Database
As we saw when testing the PHP installation earlier, a basic PHP page can look just like a plain HTML page with a couple of extra tags to mark the PHP section. We will end up with a purely PHP page, but to start with, just the inner section will be PHP.
<html>
<body>
  Hello, World! This is my very own web server!<br />
  <?php
    mysql_connect("localhost", "wishuser", "wishpass")
      or die ("Failed to connect to database: " . mysql_error());
    mysql_select_db("wishlist")
      or die ("Failed to select database");
    $result=mysql_query("select * from item;");
    while ($row = mysql_fetch_assoc($result)) {
      echo "Item " . $row['id'] . ": " . $row['title'];
      echo " ($" . $row['price'] . ") at " . $row['url'];
      echo "<br />";
    }
  ?>
<body>
<html>
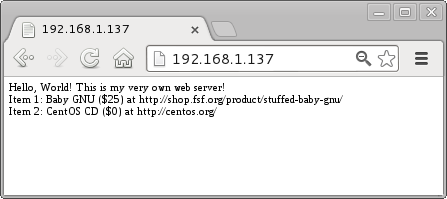
Before we go into the code above, let's see the results, and then pick apart the mechanism. The two items that we added into the database have been pulled out and displayed, each on their own line. There's no fancy formatting, and I've even left the "Hello, World!" message in there to show that it is still really the same test page that we installed to prove that PHP was working at all.

How was this achieved in a few short lines of PHP? Just like logging in to a database manually via the mysql command-line tool or with phpMyAdmin, we connect to the database server, providing a username and password, and then select the database instance that we want to use ("wishlist", in this case). Then we issue a SQL statement, "select * from item;", and fetch the results.
mysql_connect() takes 3 arguments: the server to connect to, and the username and password combination to authenticate with. If that fails, whether because of a network error, invalid password, the database server being down, or any other reason, it will return a failure code. In that case, the PHP die() function will be called. This stops execution immediately after displaying a final, dying message. Hopefully you won't have any problems, but you can test it by putting an invalid password or a bad hostname. You should get message along the lines of: "Failed to connect to db: Access denied for user 'wishuser'@'localhost' (using password: YES)". Later, we can disable these verbose error messages (they can be very useful to attackers) but for now, it is helpful for diagnosing connectivity issues.
Don't die!
When writing a full web application, do not usedie() directly in this way, as the HTML page is still incomplete. For this simplistic test page, the web browser can close the open HTML tags, but for a more complex page, with footer code still unsent to the browser, the user's experience will be of a broken web page. Instead, write a wrapper function which displays the error message, and tidily inserts the HTML footer and so on, before calling die(). That way, the end user still gets shown a properly formatted web page, even though it does contain an error message. We will create a tidydie() wrapper later.Then, mysql_select_db() chooses which database to use - we want the "wishlist" database. Again, this can call die() if anything goes wrong, since there is no point in continuing if we are unable to select the right database.
Having connected, mysql_query() executes the actual query, and returns something called a resource. We pass this resource to other mysql-based PHP functions such as mysql_fetch_assoc() later, to process the result of the query.
mysql_fetch_assoc() gets the next result as an associative array (that is, an array which is indexed by the names of the database fields, rather than by number) from the query result set passed to it. This means that we can refer to "$row['price']" rather than just "$row[3]". Each time mysql_fetch_assoc() is called, it gets the next result from the query; when all results have been processed, it returns FALSE..
In this particular case, a while loop goes through each result found and processes it with mysql_fetch_assoc(). As mentioned above, by calling it as $row = mysql_fetch_assoc($result), we can get the fields from that result by their name in the database, such as $row['price'] or $row['url']. Because mysql_fetch_assoc() fails (returns FALSE) when there are no more results to process, the while loop will exit once it has processed all of the results from the query.
Finally, the data is shown to the user by echoing the results in a presentable way. The period (".") represents string concatenation, so we can put hard-coded text like "Item " along with variable results like "$row['id']". Echoing out a "<br />" after each line inserts a line break into the HTML.